
The website itch.io is one of the most popular open marketplaces for indie game developers and artists to share and sell content. It features a wide range of games, assets and tools and allows anyone to upload their creations for free.
One of the key features of itch.io is that it lets you upload and run HTML5 games straight in the browser, no downloading required. This makes it easy to get players to try out your games and other projects. Since Godot supports web exports, it’s a great option to share your creations with others.
Getting Started
This tutorial will guide you through the process of exporting your Godot project to a web export and publishing it on itch.io.
To get started, you can either use your own project or download the sample project to use as an example using the Download materials link at the top and bottom of this article.
Note: At the time of writing, web exports are only supported for projects written in GDScript, not C#.
If you chose to use the sample project, unzip the materials to a folder and open the starter project in Godot. If you decided to use your own project, you can skip the rest of this section and skip to the Exporting a Web export section.
The sample project is a game named Aerixa. It’s an endless top-down shooter game that serves as a realistic example for the web export.

Run the project to see the game in action and to test if it’s working as expected. Once you’re done, it’s time to export it to a web export.
Exporting a Web Export
A web export in Godot uses a combination of HTML, WebAssembly and WebGL 2.0 to create a web application. Godot uses Emscripten to compile the project to WebAssembly.
Preparing For Exporting
To set up a web export, start by selecting Project ▸ Export in the top menu to open the Export menu.

From here, click the Add… button at the top and select Web.

This adds a web export preset to the list and selects it.

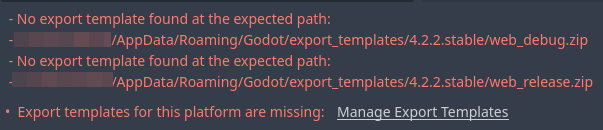
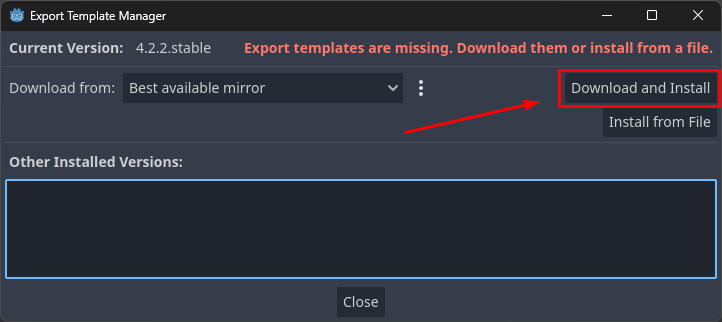
If this is the case, click the Manage Export Templates link to open the Export Template Manager. Next, click the Download and Install button at the top right to get the necessary export templates automatically.
You can leave the export settings on the right at their default values, as these are optimized for desktop browsers. Next, you’ll want to set the Export Path. This is the path where you want the export to the HTML file and supporting files.
To change the path, click the folder icon next to Export Path and use the Save a File dialog to create a new folder for the export.
![]()
Make sure to name the file index.html, as that’s what itch.io expects to be the entry point.

Now click the Save button to confirm the path.
Creating the Export
To create the actual web export, click the Export Project… button at the bottom of the Export menu.

This will open the Save a File dialog once again, with an important difference: you can now choose to export a debug build.

Debug builds are more lenient with error handling, but they’re slower when it comes to performance. On platforms like Windows, macOS and Linux, debug builds also come with an extra executable to open a console window.
Since you want to publish your web export for the general public, it’s best to turn off the Export With Debug option. Now click the Save button to create the export.
Finalizing the Export
Web games on itch.io either require a single html file, or a zip file containing the html file and supporting files. Since Godot’s web exports requires multiple files to work, you’ll need to create a zip file.
To create the zip, navigate to the output directory of the web export via your OS’ file explorer. Next, select all files and use a suitable zip tool for your OS to create a zip file. In my case, I’m using 7zip on Windows. The name of the zip doesn’t matter, so anything goes.

With the web export ready and zipped, you can move on to itch.io to publish your game.
Publishing to itch.io
The first step is to log in to itch.io. Navigate to https://itch.io/ and log in to your account. If you don’t have an account yet, you should register first.
Creating a New itch.io Project
The first step to publish a game to itch.io is to create a new project. The quickest way to do that is via the Creator Dashboard. Once you’ve opened your dashboard, scroll to the bottom and click the Create new project button.

This will open a page where you can fill in information about your project. As a general rule, you want this to be as complete as possible so your project will get more visibility.
For the sample project, these is the general information (everything above Pricing) I filled in:

Feel free to change any of the fields to your preference, except for Kind of project. It’s best to change it to HTML when creating web projects as that will boost the amount of visitors to your project.
The project pricing only applies to downloads, not to web builds so it’s not relevant in this case. However, you could add a demo of a game you made as the web build and then distribute the full version as a paid download. For the sample project, I’m leaving the pricing at its default “$0 or donate” value.

Source link
Leave a Reply