Explore the various types of Constraints and how to use them in a SwiftUI-powered application

Most would agree that augmented reality has yet to find its niche, with the reasoning most frequently quoted is: the absence of a killer app. A truism, although I suspect another reason is that it is tough to code augmented reality apps. It is a challenge because the math behind working out the positions and angles of interacting nodes has Computer Science at its core. Plus, the cryptography of graphics.
Spaced out science that, thankfully, some Apple engineers have already done and encoded into the SceneKit framework with their best work shown in the final SceneKit presentation at WWDC2017. Join me in this piece to look at the effects behind the mind-baffling math they built into constructs they called Constraints.
Tanks
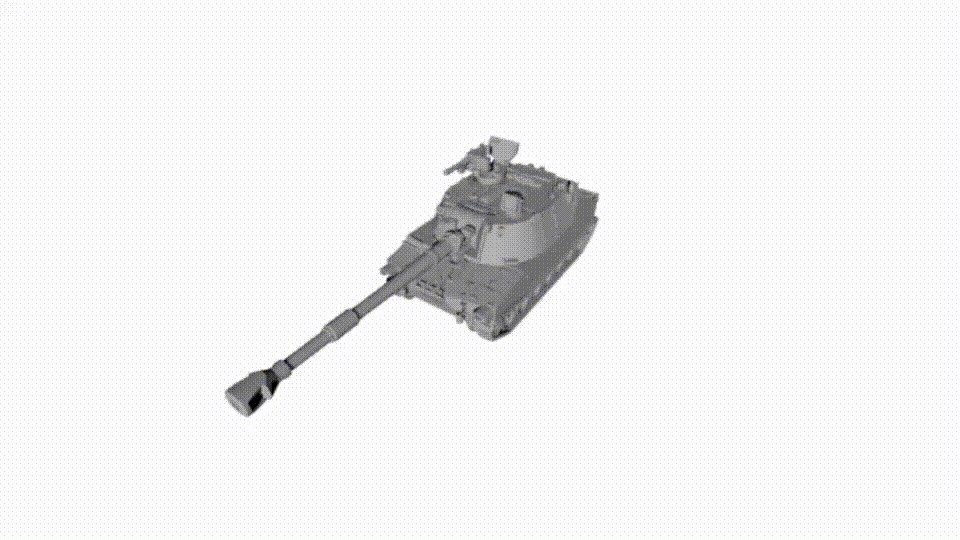
Before I dive in, however, I want to start by crediting the draftsman/artist Bergman, who has drawn a collection of out-of-this-world tanks you can find here. Tanks that I will use throughout this article to illustrate those constraints. I will start by explaining the tank build, in the animated GIF headlining this article.
Within the scene, I use a Bergman tank model that comes in six pieces, of which I used five. The principal chassis includes tracks, the turret, the main gun, the hatch, and the machine gun, and the sixth piece that is optional [in my book]

Pieces I tried to fit together the best I could. In addition to the 5 SCNReferenceNodes, I created two base nodes. I added the chassis to the first base node and everything else to the second. I did so because I needed the turret + guns to move separately from the chassis. I also wanted to change the pivot points on several model components to ensure they pivoted on the correct axis. The necessary pivot code I found on SO here.
minimum = SIMD3<Float>((T1100m109a5turret19ReferenceNode?.boundingBox.min)!)
maximum = SIMD3<Float>((T1100m109a5turret19ReferenceNode?.boundingBox.max)!)translation = (maximum + minimum) * 0.5
T1100m109a5turret19ReferenceNode?.pivot = SCNMatrix4MakeTranslation(translation.x, translation.y, translation.z)
I also needed to add a directional light to the scene since the model didn’t come out without it. Finally, I used the subscription code pattern within the Combine framework to link the SwiftUI interface to a couple of rotations I put in place for the turret, main gun and machine gun, just for fun.
turretSub = turretPass.debounce(for: .seconds(0.01), scheduler: RunLoop.main)
.sink(receiveValue: { [self] direct in
SCNTransaction.begin()
SCNTransaction.animationDuration = 2.0
if direct {
turretNode.simdEulerAngles = SIMD3(x: 0, y: Float(30).degrees2radians(), z: 0)
} else {
turretNode.simdEulerAngles = SIMD3(x: 0, y: Float(0).degrees2radians(), z: 0)
}
SCNTransaction.commit()
})
And — I should mention this extension to convert degrees to radians and radians to degrees for good measure.
internal extension Float {
func radians2degrees() -> Float {
return GLKMathRadiansToDegrees(self.rounded(FloatingPointRoundingRule.up))
}
func degrees2radians() -> Float {
return GLKMathDegreesToRadians(self.rounded(FloatingPointRoundingRule.up))
}
}
Ok — Now, on to the main course — constraints — which you’re pleased to learn have no connection with those painful things of the same name in UIKit, although I must admit that their use isn’t a piece of cake either.
Here is a slide out of WWDC2017 of said constraints; the grey boxes were already available in a prior version of SceneKit, and the green boxes were new. Apple talked about most of these in the context of the camera. Although since you’re adding them to SCNNodes, there is no reason to use them with the camera; in theory, you could use them on any node.
You can add constraints to a node at any point in your code, although the setup is the best place to do so. Rules that you can turn up or down, on or off, using a variable called the influencing factor. One means full-on, zero means off, values in between a halfway house. As explained in the WWDC2017, you want to use constraints in pairs or more.
Self-Driving
Constraints in this context are a bit like self-driving nodes. Self-driving, as in they will manage the angles or positions of the nodes in your app. Controls that will take your settings as a hint and then decide where they need to be. Weak hints that they will ignore if they think they are out-of-bounds.
It is a good and bad thing; a good thing because it takes the mind morphing math out of the problem, but the bad thing is that it can become a real challenge to work out what is going on.

SCNLookAtConstraint
Bon, Ok — now, although not new, the SCNLookAtConstraint will likely be the first one you encounter, certainly from the camera point of view. Its purpose is to keep the nodes you link to it within the viewport.
let lookAtConstraint = SCNLookAtConstraint(target: tankNode)
lookAtConstraint.influenceFactor = 0.5
lookAtConstraint.isGimbalLockEnabled = truecameraNode.constraints = [lookAtConstraint]
Code that looks like this in our tank world. Note that the tank is moving here, and the camera is stationary.

As you can see, the tank disappears into infinity and beyond almost.
SCNDistanceConstraint
Now obviously, letting your game player move to infinity and beyond isn’t that useful. To fix this, you might be tempted to add a distance constraint; I was. A good solution — keeping whatever minimum/maximum distances you have coded into there.
let distanceConstraint = SCNDistanceConstraint(target: tankNode)
distanceConstraint.influenceFactor = 1.0
distanceConstraint.minimumDistance = 6.0
distanceConstraint.maximumDistance = 8.0cameraNode.constraints = [lookAtConstraint, distanceConstraint]distanceConstraint.influenceFactor = 1.0distanceConstraint.maximumDistance = 8.
Code that looks like this in our tank world. Note that the tank and the camera are moving here, although, in my code, I am only moving the tank; the camera is in auto-driving mode.

Although perhaps its not ideal in this case, since the camera is so close to the tank, you don’t see the signs come up until they are almost on you.
SCNReplicatorConstraint
Assuming this isn’t what you wanted, a replicator constraint would be the alternative. Using it, with the correct parameters, you can get your camera to follow the player taking care this time to maintain the exact positioning and angle it had before the node moved. You can see here I am configuring the constraint with the position of the cameraNode.
let replicatorConstraint = SCNReplicatorConstraint(target: tankNode)
replicatorConstraint.positionOffset = SCNVector3(cameraNode.position.x,cameraNode.position.y,cameraNode.position.z)
replicatorConstraint.replicatesOrientation = falsecameraNode.constraints = [replicatorConstraint, lookAtConstraint]
Code that looks like this in our tank world. Note as you watch it, I moved the camera in and out. Movements that are taken into consideration when I move the tank.

SCNAccelerationConstraint
This constraint is even more subtle than the last one I showed you. It introduces a lag to the camera’s movement, although I wonder if this video does justice.
let accelerationConstraint = SCNAccelerationConstraint()
accelerationConstraint.maximumLinearAcceleration = 0.02cameraNode.constraints = [replicatorConstraint, lookAtConstraint, accelerationConstraint]
Code that looks like this in our tank world. It is not so easy to see; but feels different. The acceleration constraint here is slowing down the responsiveness of the camera when following the tank.

SCNTransformConstraint
But wait — because even in the auto-driving mode, you might still want to add some limits to the mix. Limits that are not intended as hints, but definitive red lines. In the last example, I allowed the player to move the camera in all directions at any angle, and it works too well because if they move the camera too low, it ducks below ground. To stop that from happening, I can set a transform constraint to restrict the camera movement to a positive y-axis.
let transformConstraint = SCNTransformConstraint.positionConstraint(inWorldSpace: false, with: { (node, position) -> SCNVector3 in
if node.position.y < 0 { node.position.y = 0 }
return node.position
})
I did not have to include a GIF of this since showing how you can stop something from showing makes no sense.
SCNBillboardConstraint
Finally, I want to mention this constraint, which is the exception to the rule since it makes no sense to add it to the camera, only to nodes. It works by changing the angle of the node so that it always faces the camera.
let boardNodeConstraint = SCNBillboardConstraint()
boardNode.constraints = [boardNodeConstraint]
Code that looks like this in our tank world. Note that I start by moving the camera, and then I move the tank. The colored boards, in the meantime, follow the camera, always remaining readable.

All of which brings me to the end of this paper. It’s true that I didn’t touch SCNIKConstraint, SCNSliderConstraint or SCNAvoidOccluderConstraints, which need an article in their own right, besides which this one was getting rather long.
I hope you enjoyed reading this as much as I did writing it.
Source link
Leave a Reply